A quick detailed guide on the operation of this cable tester. Learn fast, test fast.
Detailed Operating Procedures
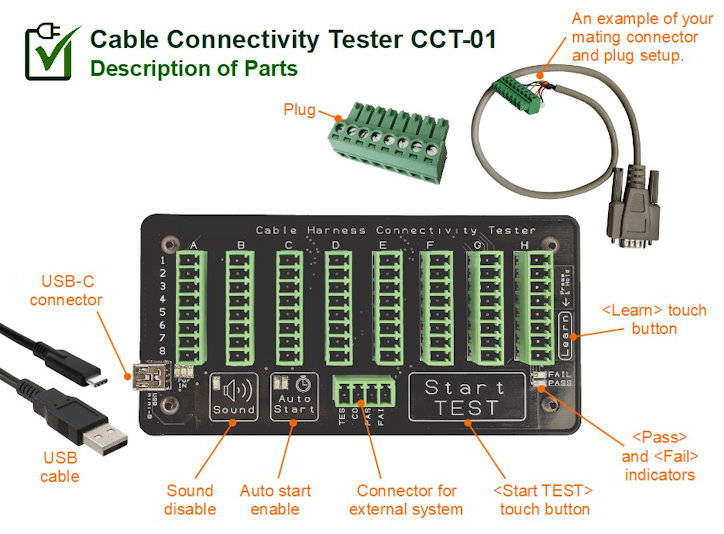
- Set up the mating connector of your cable with the cable tester CCT-01 plug (plug-gable screw terminal).
You can click here on this page for more examples of your mating connector to plug setup. - Insert the plug into the cable tester.
- Power up the cable tester with the USB mini-B cable. If you want to generate a test report for your cable, then connect the other end of the USB cable to your computer. Otherwise, you can simply connect the USB end to a USB power adapter.
- To learn the wiring connection of a master cable, connect your master cable to the mating connection that you had set up. Press and hold the [Learn] touch button for about 2-3 seconds, and released the button when you hear a double beep or see <PASS> and <FAIL> indicators blinking. The cable tester has learned the cable connection of your master cable.
- To test your production cables, replace the master cable with the cable you want to test.
- Press the [Start TEST] touch button to test the cable. If the cable connection is identical to the learned master cable, the tester will feedback with a double beep sound with the green indicator <PASS> lighted up. If the cable does not match, a long beep tone will sound with the red indicator <FAIL> lighted up. A failed cable from this tester simply means that the cable connection is different from the master cable wiring connection. This indicates one or more missing connections, wrong connections or short-circuited wire connections. You can see the problem wiring connection by generating a report from the cable tester CCT-01. Any wiring problem from the tested cable can be pinpointed to the exact pin of the connector almost instantly.
Note: You can select [Sound] and [Auto Start] options. The settings will not be saved immediately. It will only be saved into memory about 10 seconds later.
Click here to go back to the product page for CCT-01 Cable Connection Tester product.
Generate Test Report
The cable tester has features that allow you to see a detailed wiring connection matrix of the cable. This can help you know exactly why a cable has failed the test. This feature can allow you to do a quick reverse engineering of the wiring map of any new unknown cable.
A powerful x-ray feature that can decode an unknown cable instantly to enhance your productivity.
Auto-Start Test Feature
The auto-Start feature allows you to test the cable without having to press the [Start TEST] button each time you want to test a cable. Simply connect up your cable and the test procedure will be triggered automatically.
If you are testing only a few cables, you may not find this feature useful. When testing hundreds of cables, the time and effort saved from the extra step of pressing the start button can be significant.
There are two speeds that you can select for auto-start. Press the [Auto Start] button once for the slow speed, and press it again to increase the auto-start speed. The <Auto Start> indicator blinking speed will indicate if it is a slow/fast auto-start feature.
The tester will detect when your cable is plugged in, and will automatically trigger the test process. In slow auto-start mode, it will take about a 3-sec delay from the time you plug in your cable to the time the test starts. For fast auto-start mode, this will be 1 sec.
For cable with only a connector on both ends of the cable, you can safely use the fast mode.
For cables with 3 or more connectors that are needed to plug into the cable tester, our recommendation is to start first with the slow mode. When you are more comfortable and can plug the connectors into the tester fast enough, you may change it to the fast mode for a faster test turn-around. For slow mode, all the connectors have to be plugged into the tester within about 3 seconds.
For cables harness which has too many connectors to handle, this Auto-Start feature will not be suitable. Our recommendation for these cable harnesses is to use manual mode. Take your time to plug in the connectors. After you are done, pressed the “Start TEST” button to begin the testing.
Click here to go back to the product page for CCT-01 Cable Connection Tester product.
Advanced Features
The following section introduces some of the advanced features…
Detect and Catch Intermittent Faults in the Cable Wiring Connection
Suspecting that your cable having an intermittent cable fault problem. Catch the fault using this simple feature on our CCT-01 Cable Tester.
Click here to check out the procedure to use this feature to catch your intermittent fault.
Self-Diagnostic Check to Verify CCT-01 Cable Tester Device
Occasionally do a diagnostic test to check if the cable tester is in good working condition.
Click here for the procedure to start your diagnostic check.
Restore CCT-01 Cable Tester to Factory Default
Click here for the instruction to restore your CCT-01 Cable Tester to the factory default settings.