Obsolete Notice…
The content from this page is no longer useful. Please visit this page “Cable Tester Software for CCT-01” for the latest up to date solution for test report using spreadsheet.
This page is specifically written for customers who do not want to hold onto a Master Cable sample to do testing of their cables using the product CCT-01 Cable Connection Tester. A spreadsheet can be used to record the master cable connection for future testing use.
Using a master cable for CCT-01 cable tester is still strongly recommended. For more information about the background of using spreadsheet as a means of generating cable test report (without the need for master cable), you can click here for more information.
Benefits of using Spreadsheet
While the design of CCT-01 Cable Connection Tester is not intended for use with spreadsheet, there are a few benefits that worth mentioning.
- Documentation for your master cables connection.
- Easier to generate reports that is printable.
- Allows customisation of your own cable test report format.
We will not be touching on the customisation of the report. This is mainly programming using spreadsheet formulas. For those who are confident in the programming, you can download our spreadsheet and begin your customisation from our sample sheet.
For our cable tester report spreadsheet, we are using Google Sheet. The following section we will explain how to use the Google Sheet that we have written for use with CCT-01 Cable Connection Tester.
Background
The spreadsheet is for archive of all the MasterCable.
It is for customer who do not wish to, or do not have the master cable that they can use for the testing.
All the MasterCable wiring can be saved onto this spreadsheet.
When the production test cable read-out is done. The connection can be compare via this spreadsheet to check if it is the same as master cable or it is different.
This spreadsheet is suitable for use where the physical Master Cable is not readily available for us to compare with the cable under the production testing.
Access to Google Sheet here
Google Sheet test report is available for access. Please grab a copy from our Google drive. Save a fresh copy for your own use.
Do feedback to us if you encounter any issue using it. We will continue to make improvement to the sheet.
-> Click here to access to the Cable Test Report.
Quick introduction to this Google Sheet
This is the Cable Tester report spreadsheet. There is a total of 12 sheets on this file.
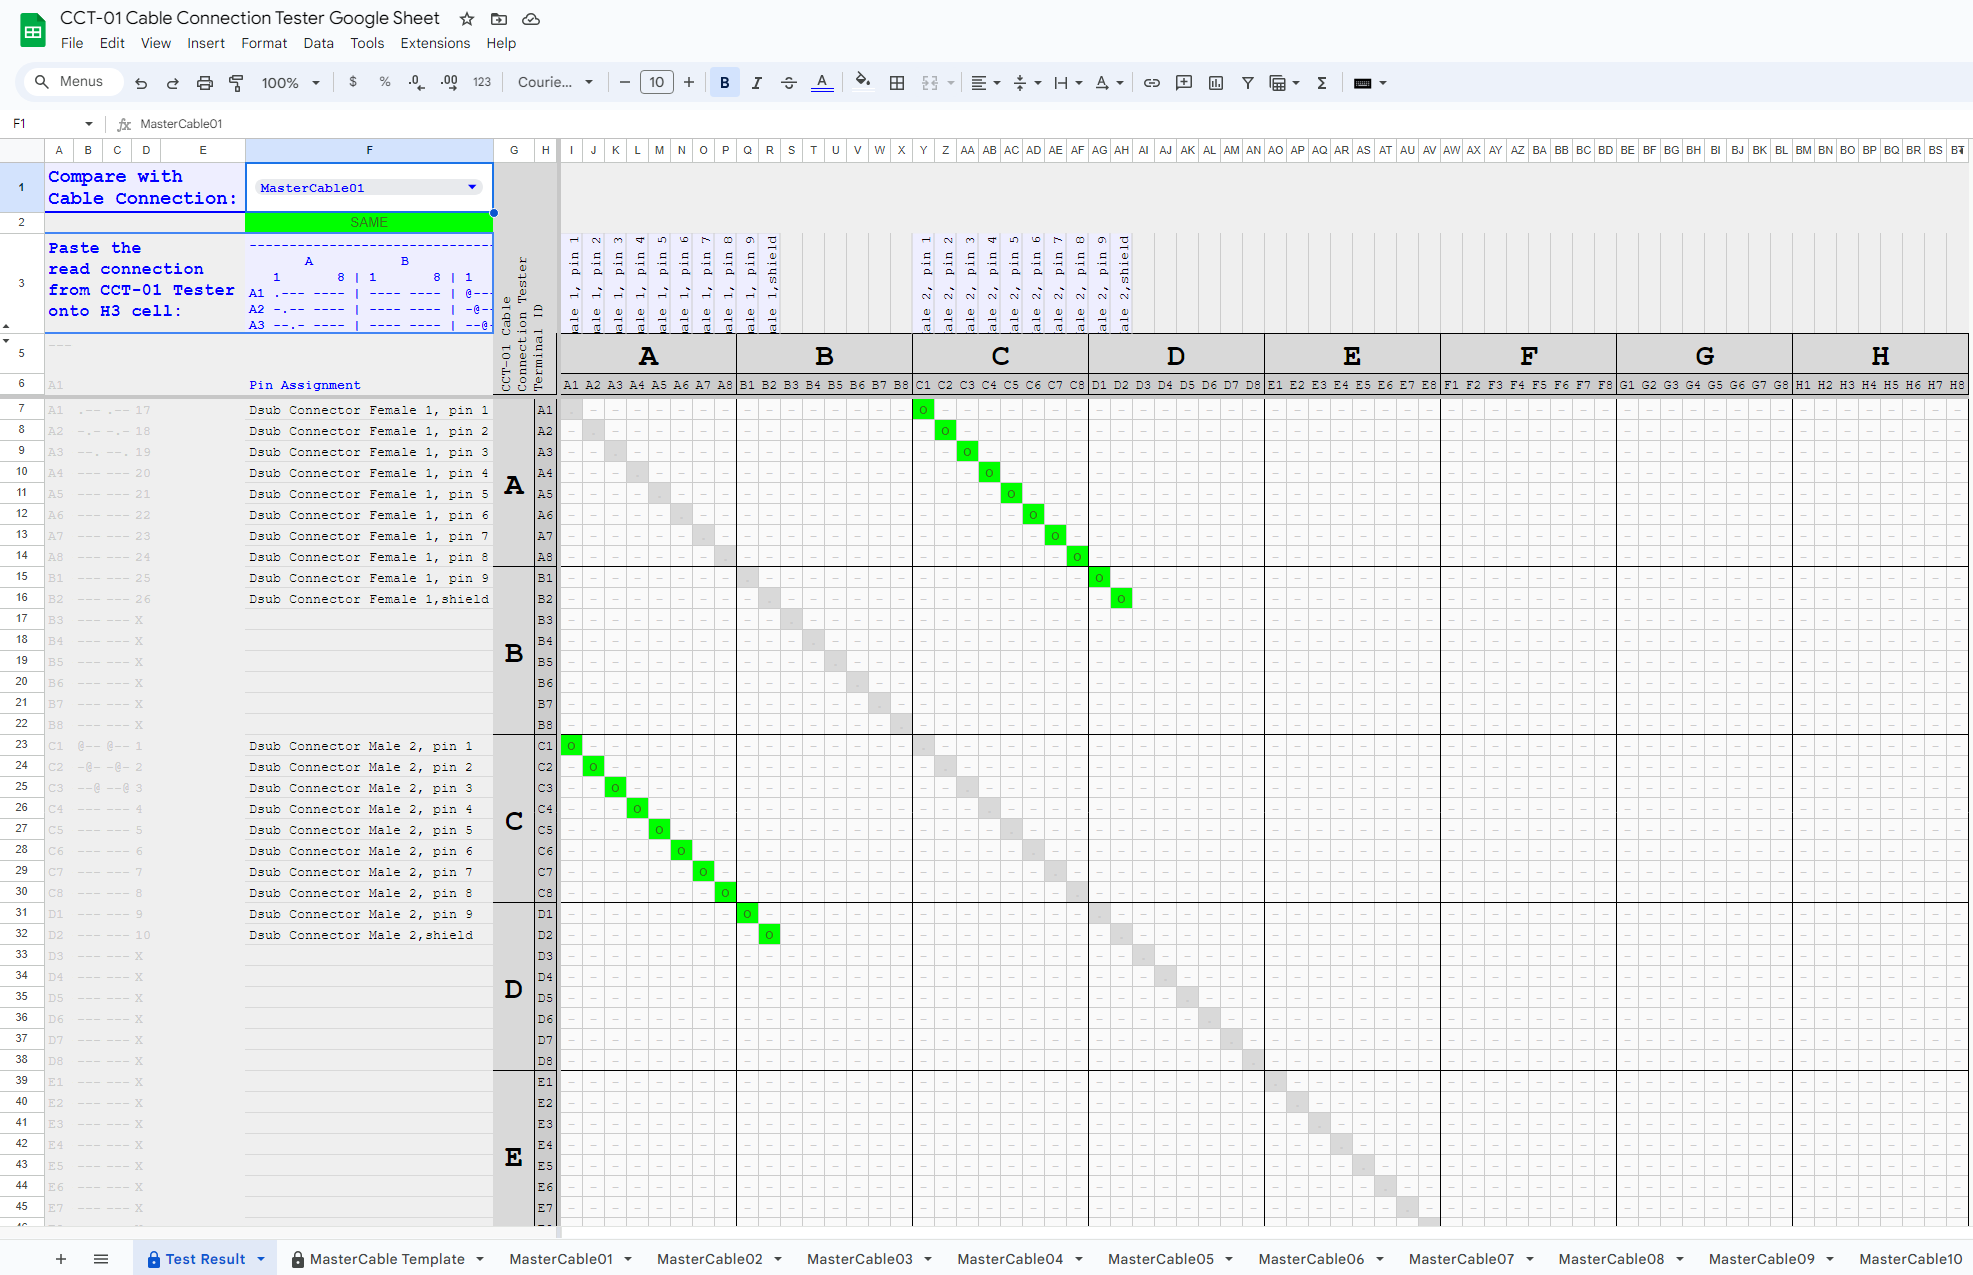
Sheet 1 Test Report
On this page, there is two parameters to input. White background cell are places where you can key in data.
On the cell F1 is for you to key in the MasterCable sheet’s name that you want to compare with. (remember to complete the MasterCable sheet before you can use this cell)
On the cell F3 is the test result of the cable connection that you have tested from the CCT-01 Cable Connection Tester. The later section below, we will provide you with the instruction to copy and paste the cable tester result onto this box cell.
Sheet 2 MasterCable Template
This sheet is a template to create as many MasterCable Sheets as you required. It is locked to prevent you from making changes accidentally.
Sheet 3 onwards are copies created from MasterCable Template
There 10 sheets of MasterCable for you to create a connection map for your cable. You can create more sheets if needed, and you can rename the sheet to any names that suits your work flow.
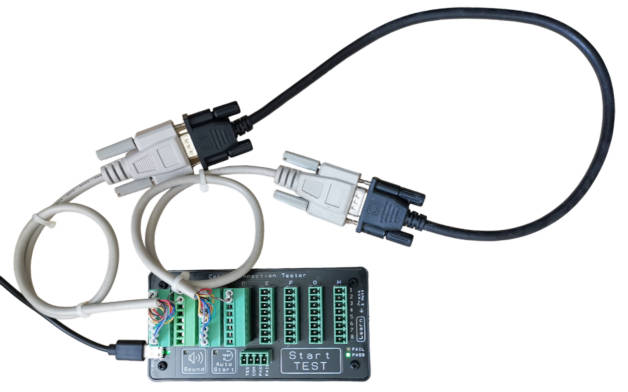
Cable Testing setup example
This setup is using a serial communication cable as an example. It has connector 01 Dsub 9 pin (female) on one end and connector 02 Dsub 9 pin (male) on the other end. The correct connection is pin to pin connection.
We will use this test connection for the setup of the Cable Tester report on the Google Sheet.
A total of 4 plugs is used. Connector 01 is plugged to A B, while connector 02 is plugged to C D.
Serial Terminal Software Preparation
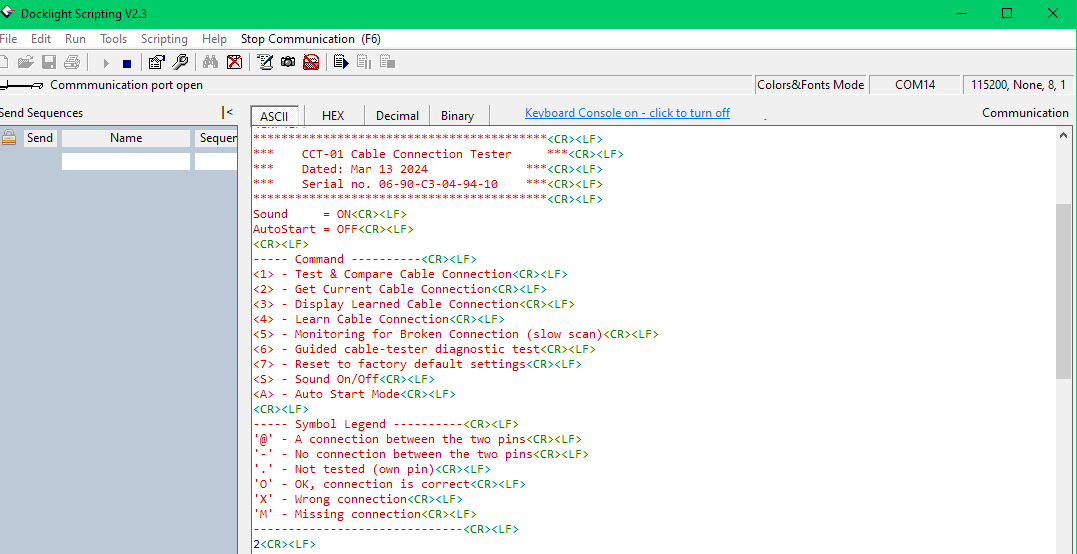
In the following step-by-step example, we are using Docklight serial terminal software (paid version) to print out the test report.
The free version of Docklight does not allow copying of the report. For an alternative serial terminal software, you can use MobaXterm or Anticyclone Systems (online cloud version) as the alternative serial terminal software to print out the test report instead.
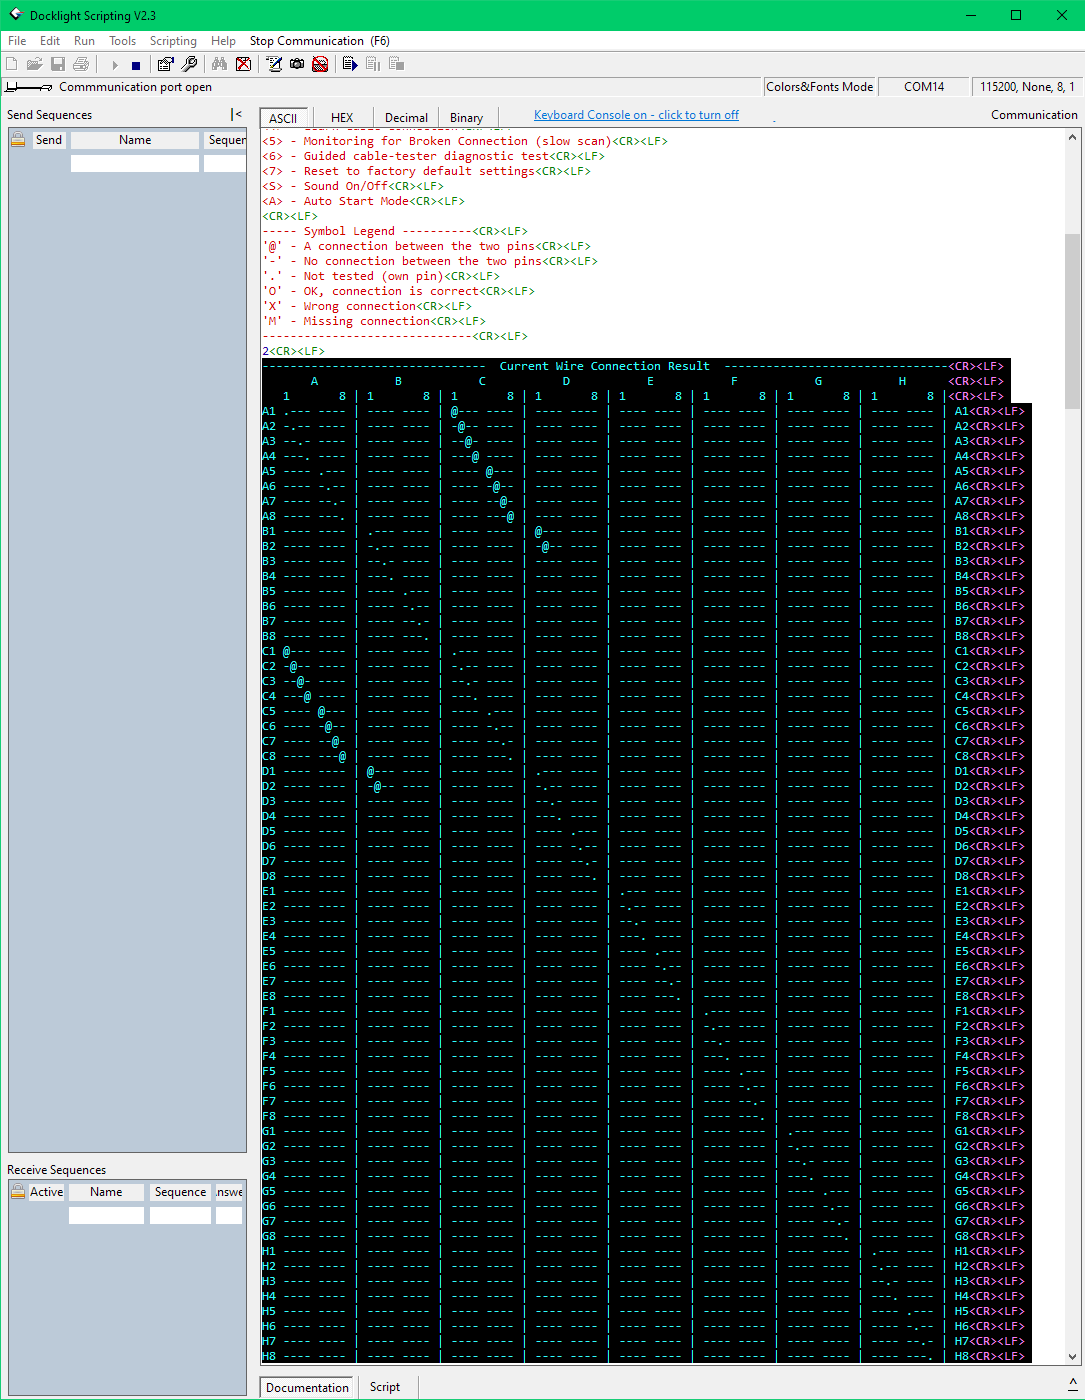
Read out cable connection result
The cable tester will scan the cable and generate us the connection result which we can cut and paste, to use it on the Google sheet report.
Connects up the CCT-01 cable tester via USB cable to your computer.
Launch the serial communication software, and connect it to the cable tester.
For more information about connecting this cable tester tool to Docklight, you can refer to this page for more information.
Click ESC to launch the menu. Or send the byte “0x1B” to the CCT-01 Cable Connection Tester.
Key in ‘2‘
<2> – Get Current Cable Connection
to instruct the cable tester to scan the cable for the cable connection.
Important Note:
Please do not select <1> – Test & Compare Cable Connection
After a quick scan on the cable, the cable tester will generate the report showing the connection matrix.
On the test report, a connection between 2 points will be represented as the symbol ‘@‘, and a non-connection will be represented as a dash ‘–‘.
If you see other symbols like ‘O’, ‘X’, ‘M’ on the report, it is likely that you have executed the wrong instruction. A reminder to only choose option 2 on the operator menu “<2> – Get Current Cable Connection”
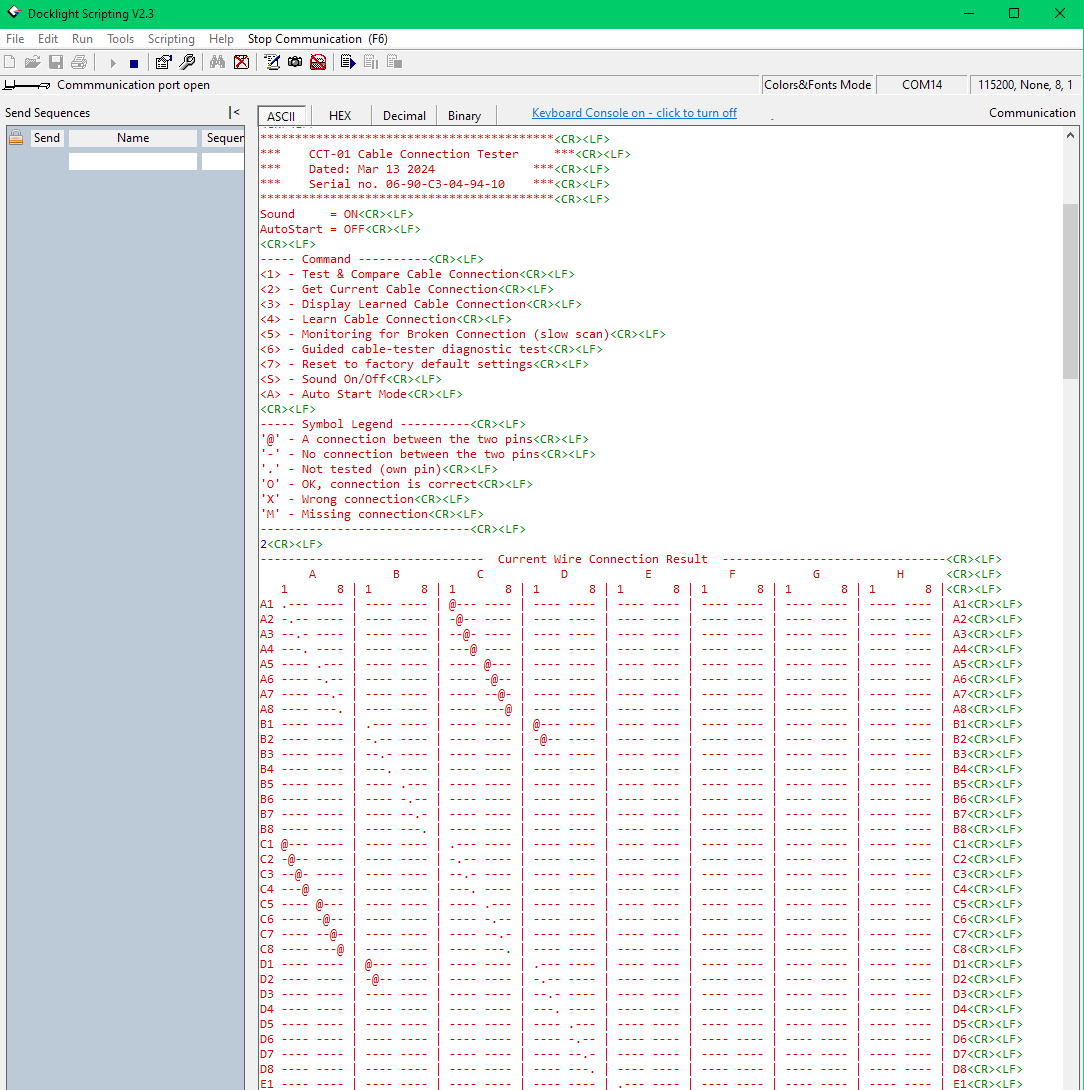
Select and copy the generated connection matrix. This connection matrix will be later pasted onto the Google sheet. The spreadsheet will analyse this set of data and generate the report from the Google sheet instead.
Ensure that you have copied the entire row from row A1 to row H8.
Document your master cable
First thing first is to do a simple documentation of your cable on the Google sheet.
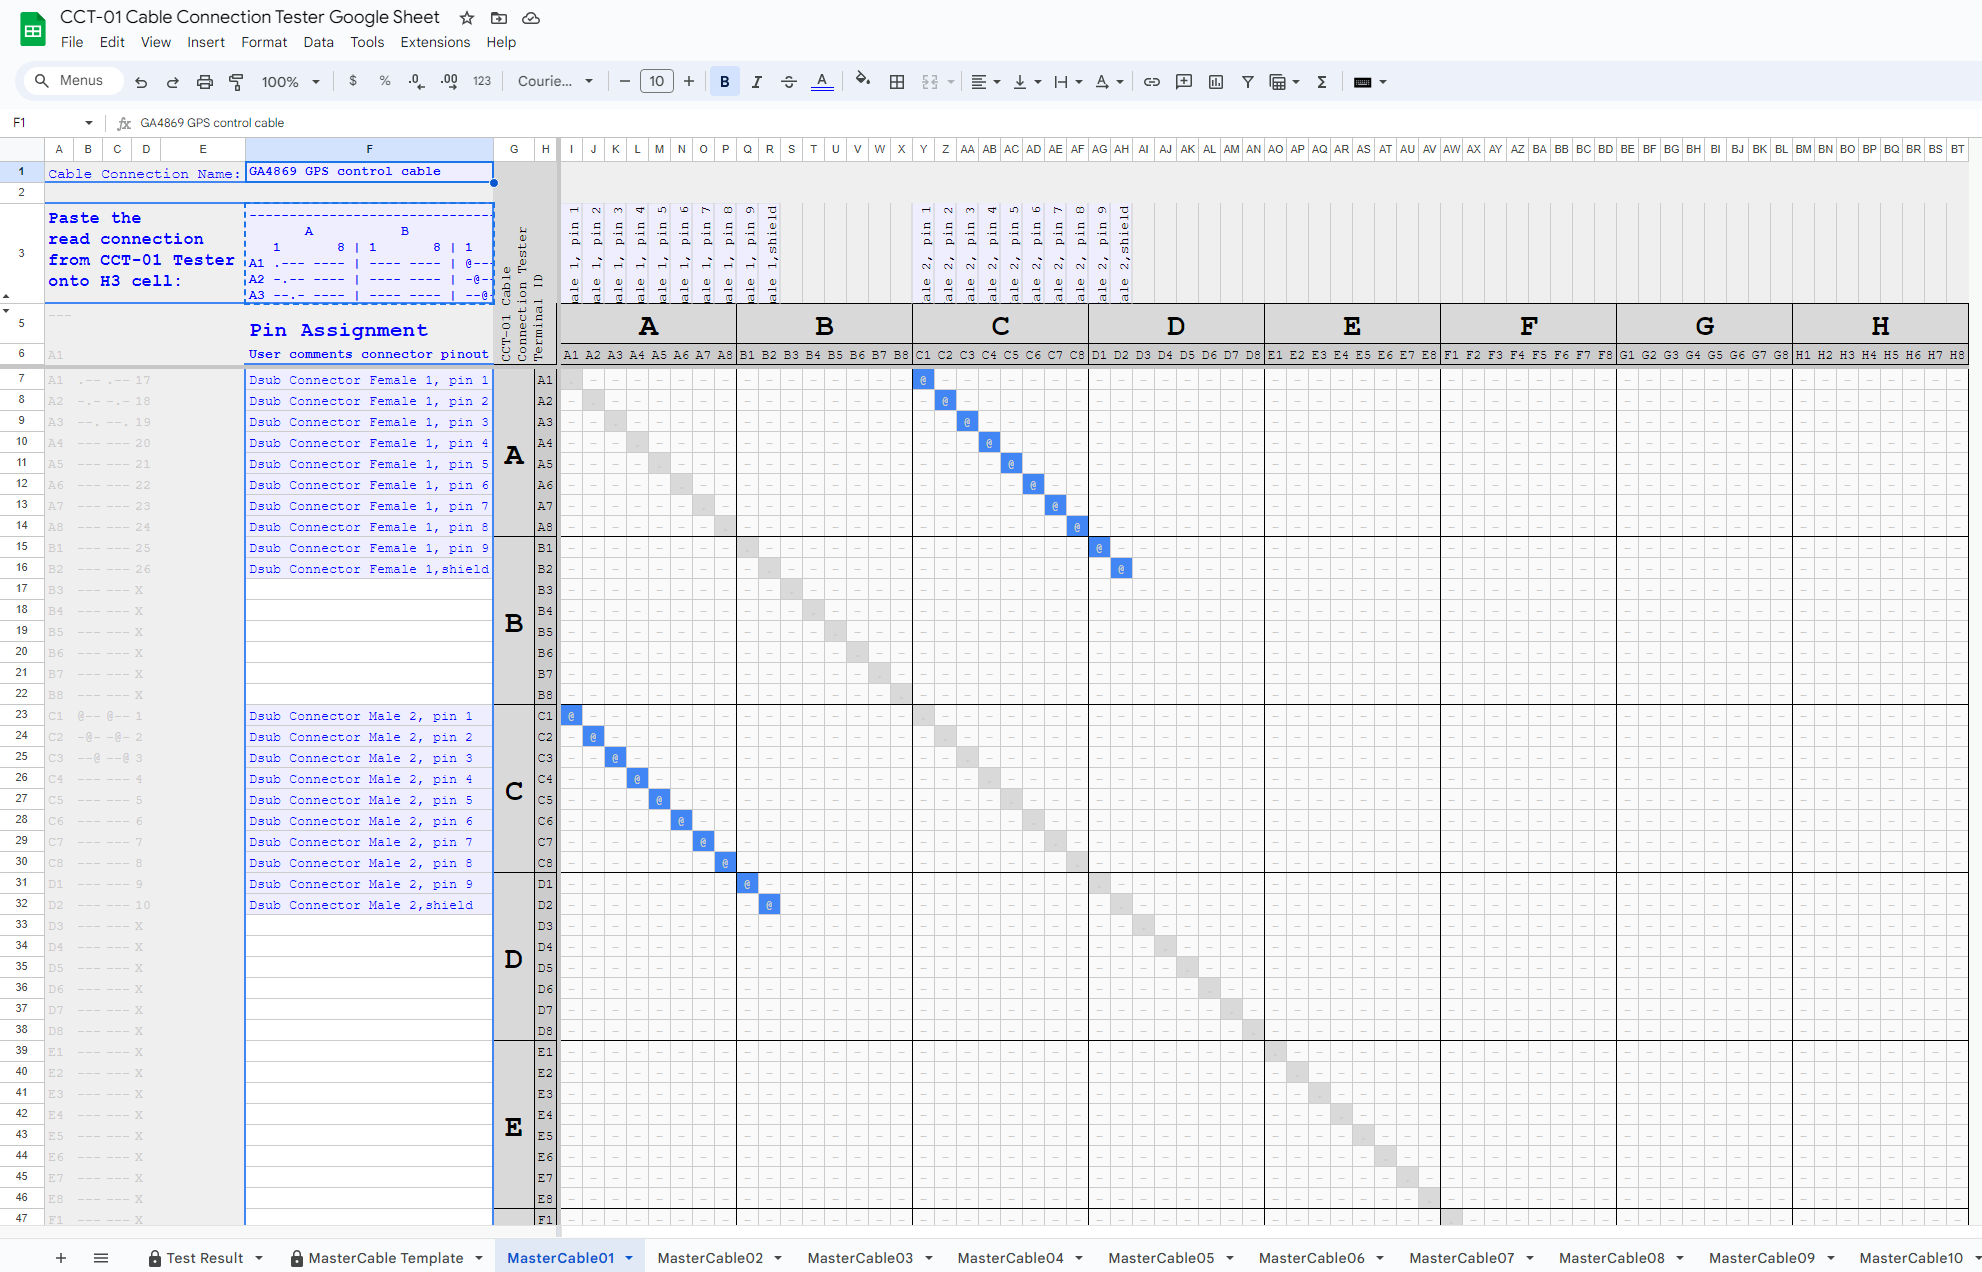
Go to the 3rd sheet labelled as “MasterCable01“.
You will get to see 3 blank regions (white background) on the column ‘F’. These are field that requires your input.
The red colored cell are the matrix map for the cable connection. Since the connection matrix is not inserted, it is showing a light red background which indicates an error in the input.
Data entry to the MasterCable01 sheet.
- F1 cell – Put a name or comment for this sheet.
- F3 cell – Paste the connection matrix that you have read from the working master cable that you have. In our example, this will be the RS232 cable that we have scanned and read.
When the correct connection matrix is paste, the matrix cells will change from red to something that look like the example here. - Cell F7 onwards – are rows of cells for you to add in your own comments to label each wire connection on the CCT-01 Cable Tester.
You have completed the documentation for your first master cable. We have named this sheet as “MasterCable01“.
You can continue to document your other cable connection on another GoogleSheet.
Using the Test Report on Google sheet
This assume that you have successful completed the documentation of your master cable connection sheet.
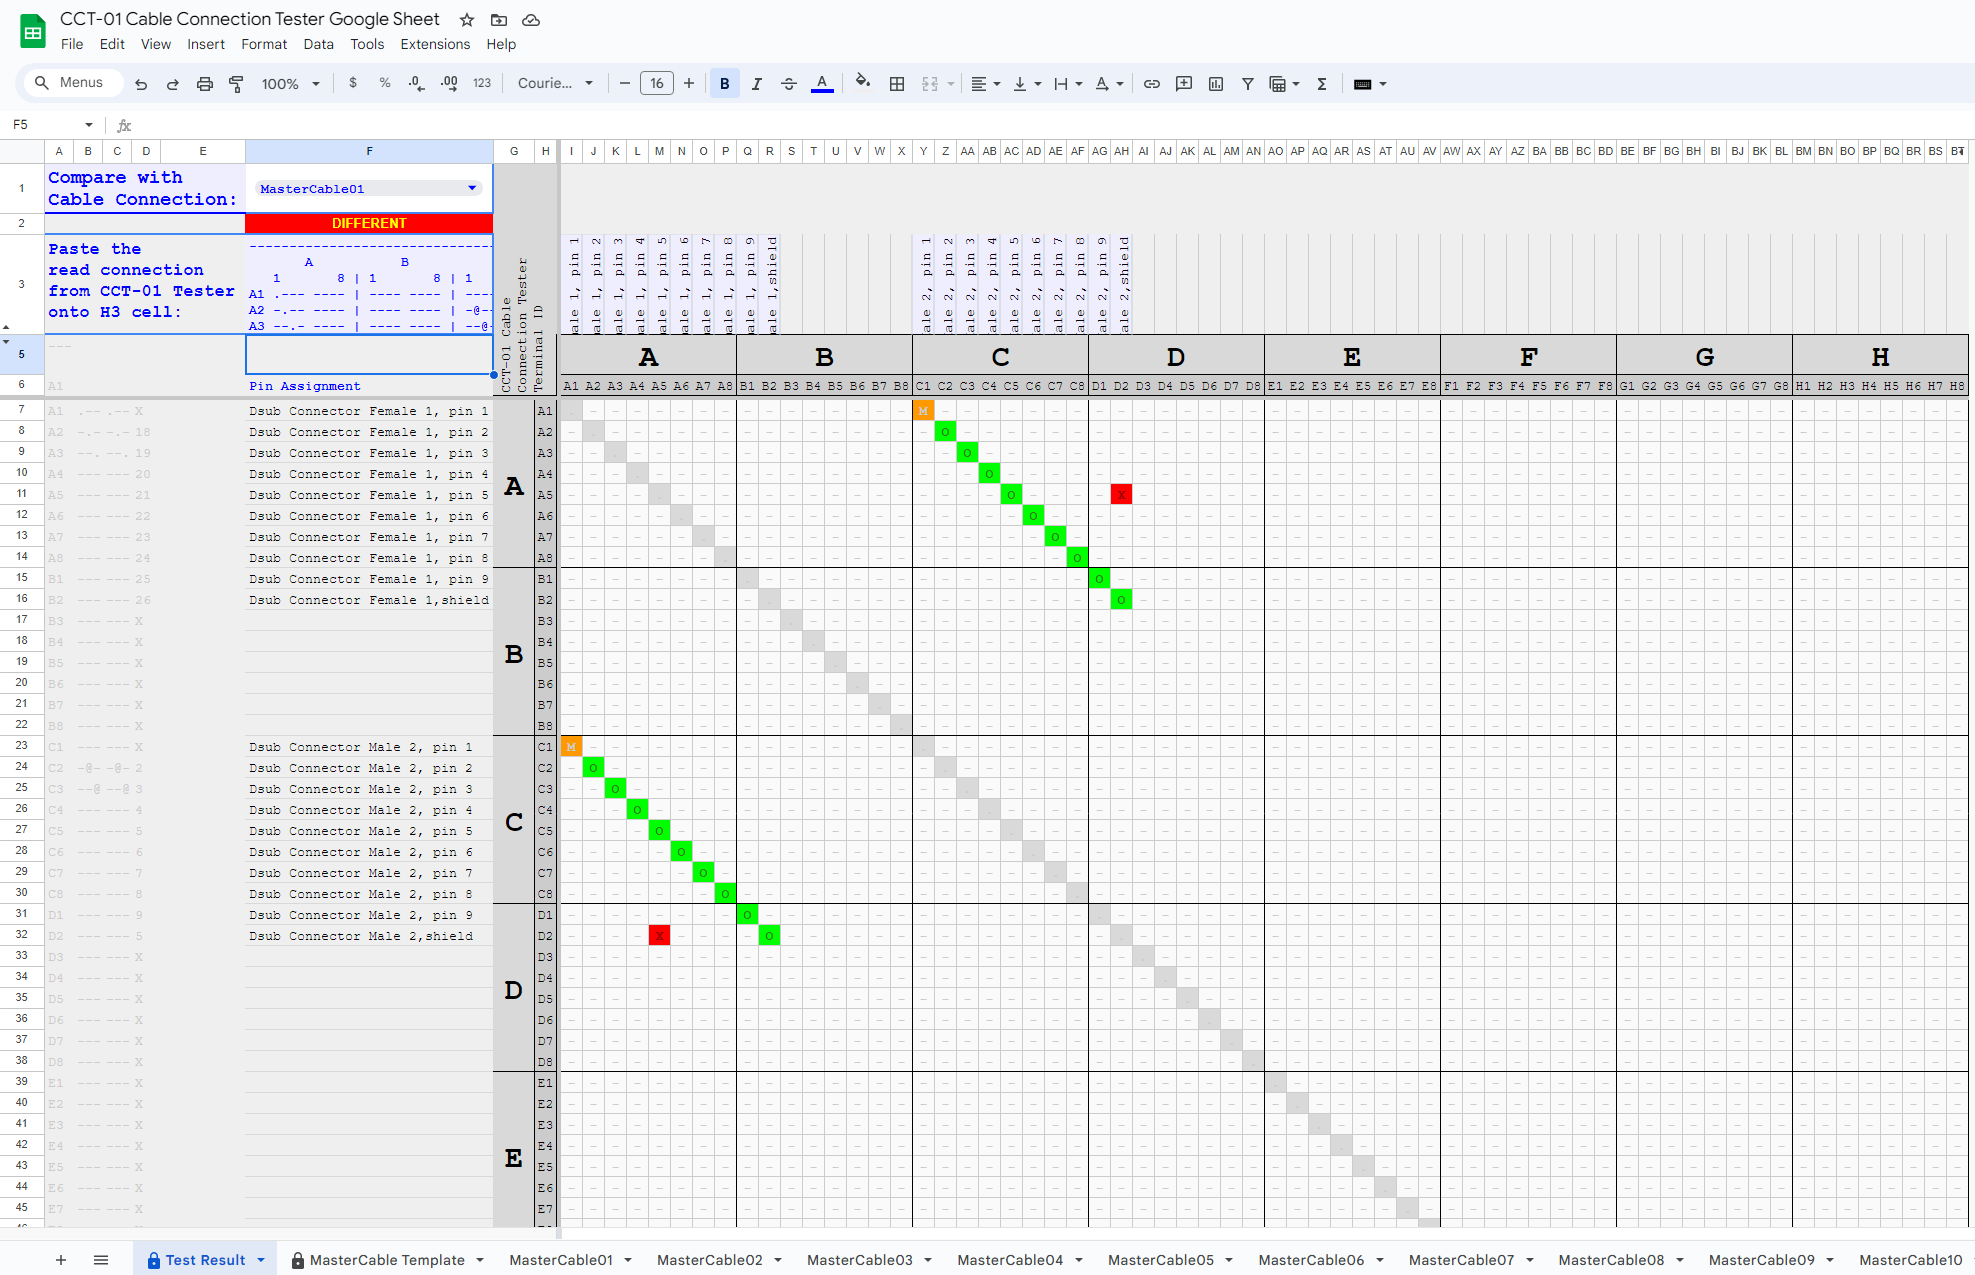
On this test report sheet, there are two input field.
- F1 cell – Key in the name of the sheet of the documented cable connection that you want to compare with. In this example, we choose the sheet “MasterCable01“.
- F3 cell – paste in the connection matrix of a new cable that you have tested.
If only F1 cell is selected, the matrix will display the documented connection of this master cable.
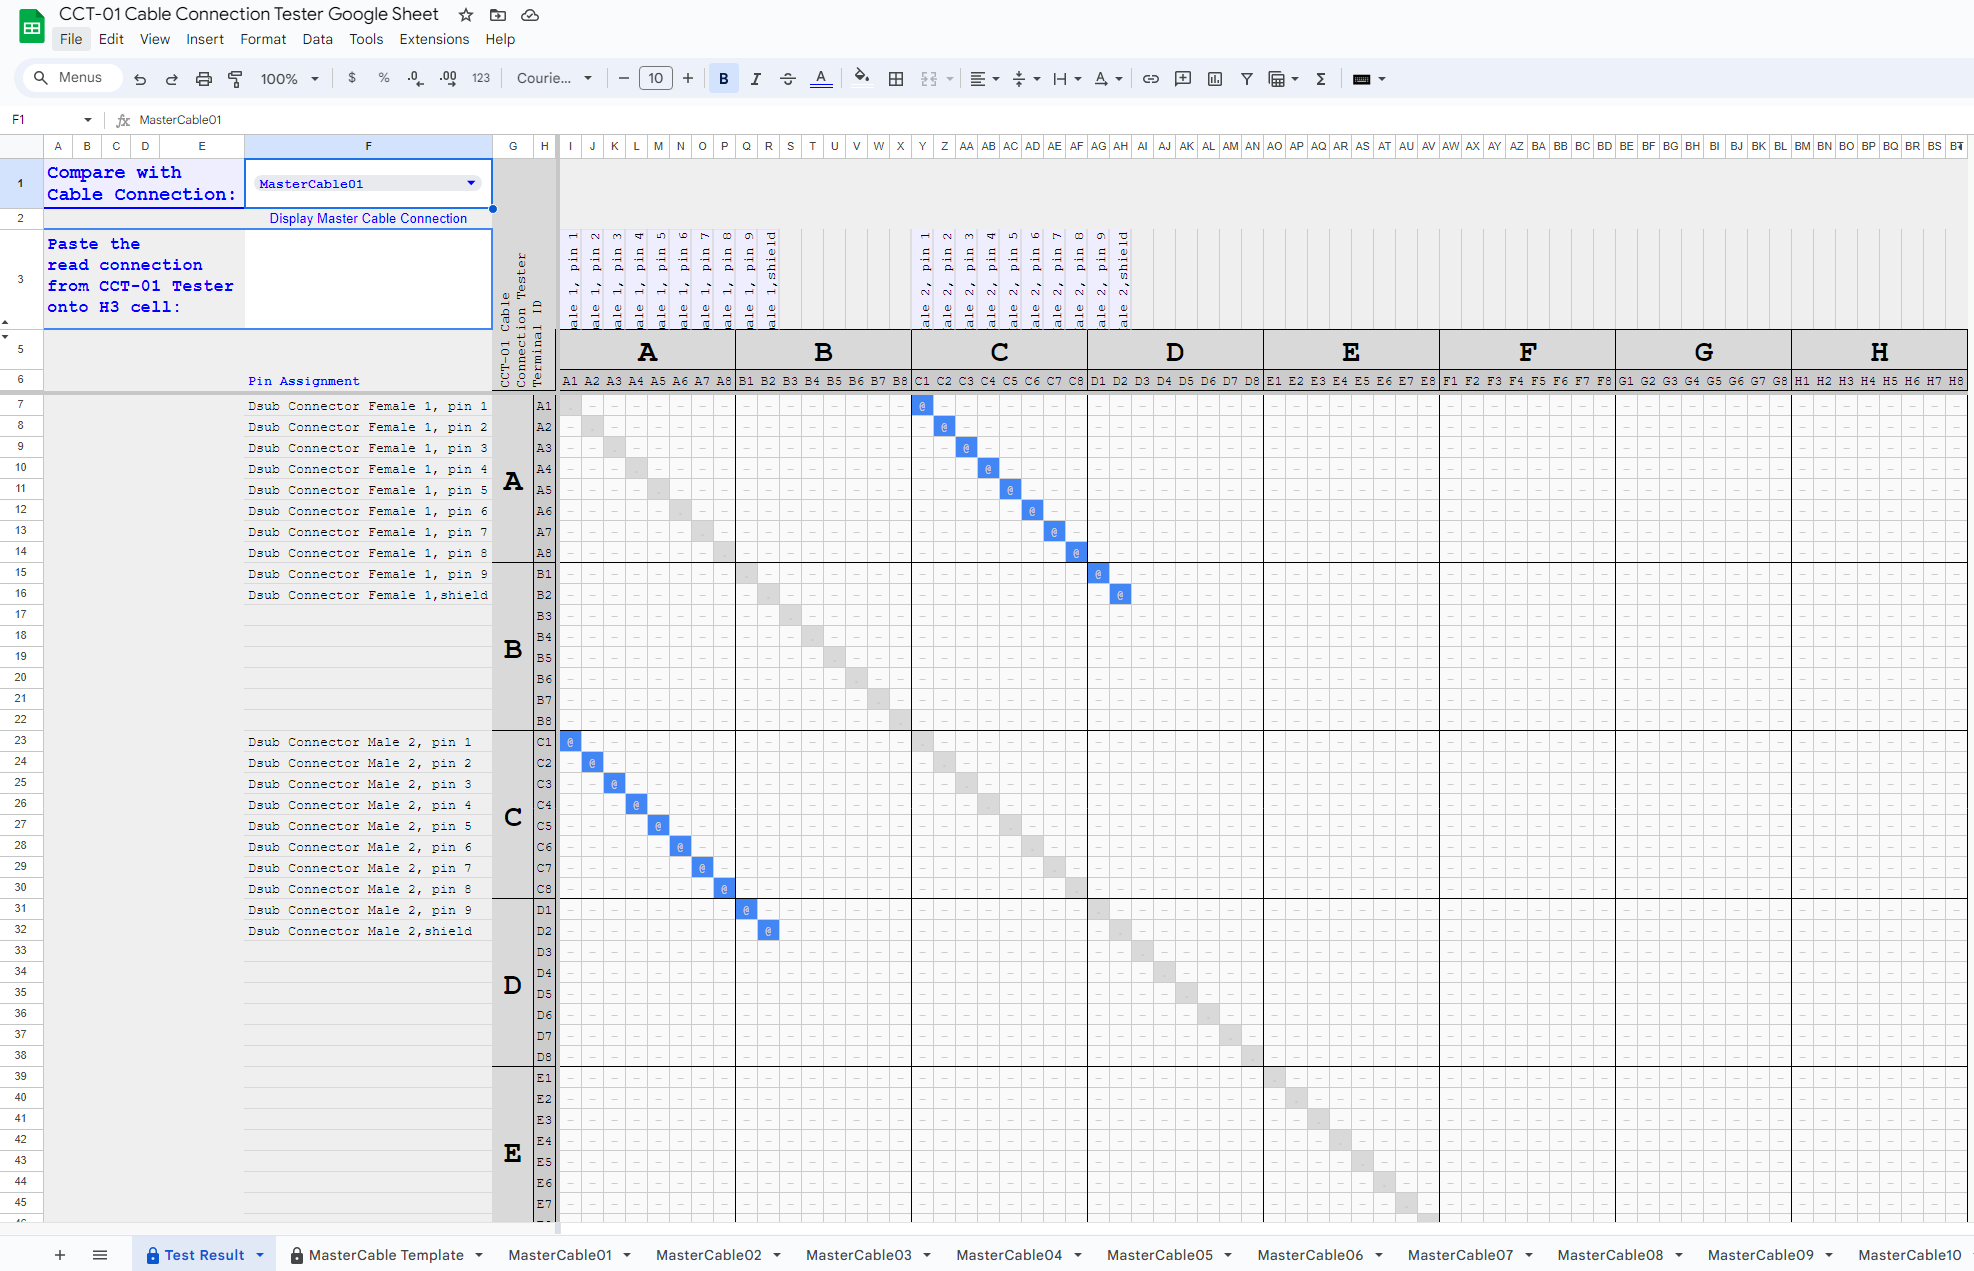
If only F3 cell is entered, the matrix will display the tested cable connection.
In this example, we use a cable connection with an error in it.
Note: A reminder when pasting the result onto F3 cell.
Please ensure to only Key in ‘2’
<2> – Get Current Cable Connection
to instruct the cable tester to scan the cable for the cable connection. Then copy the generated result to the F3 cell.
Important Note:
Please do not select <1> – Test & Compare Cable Connection
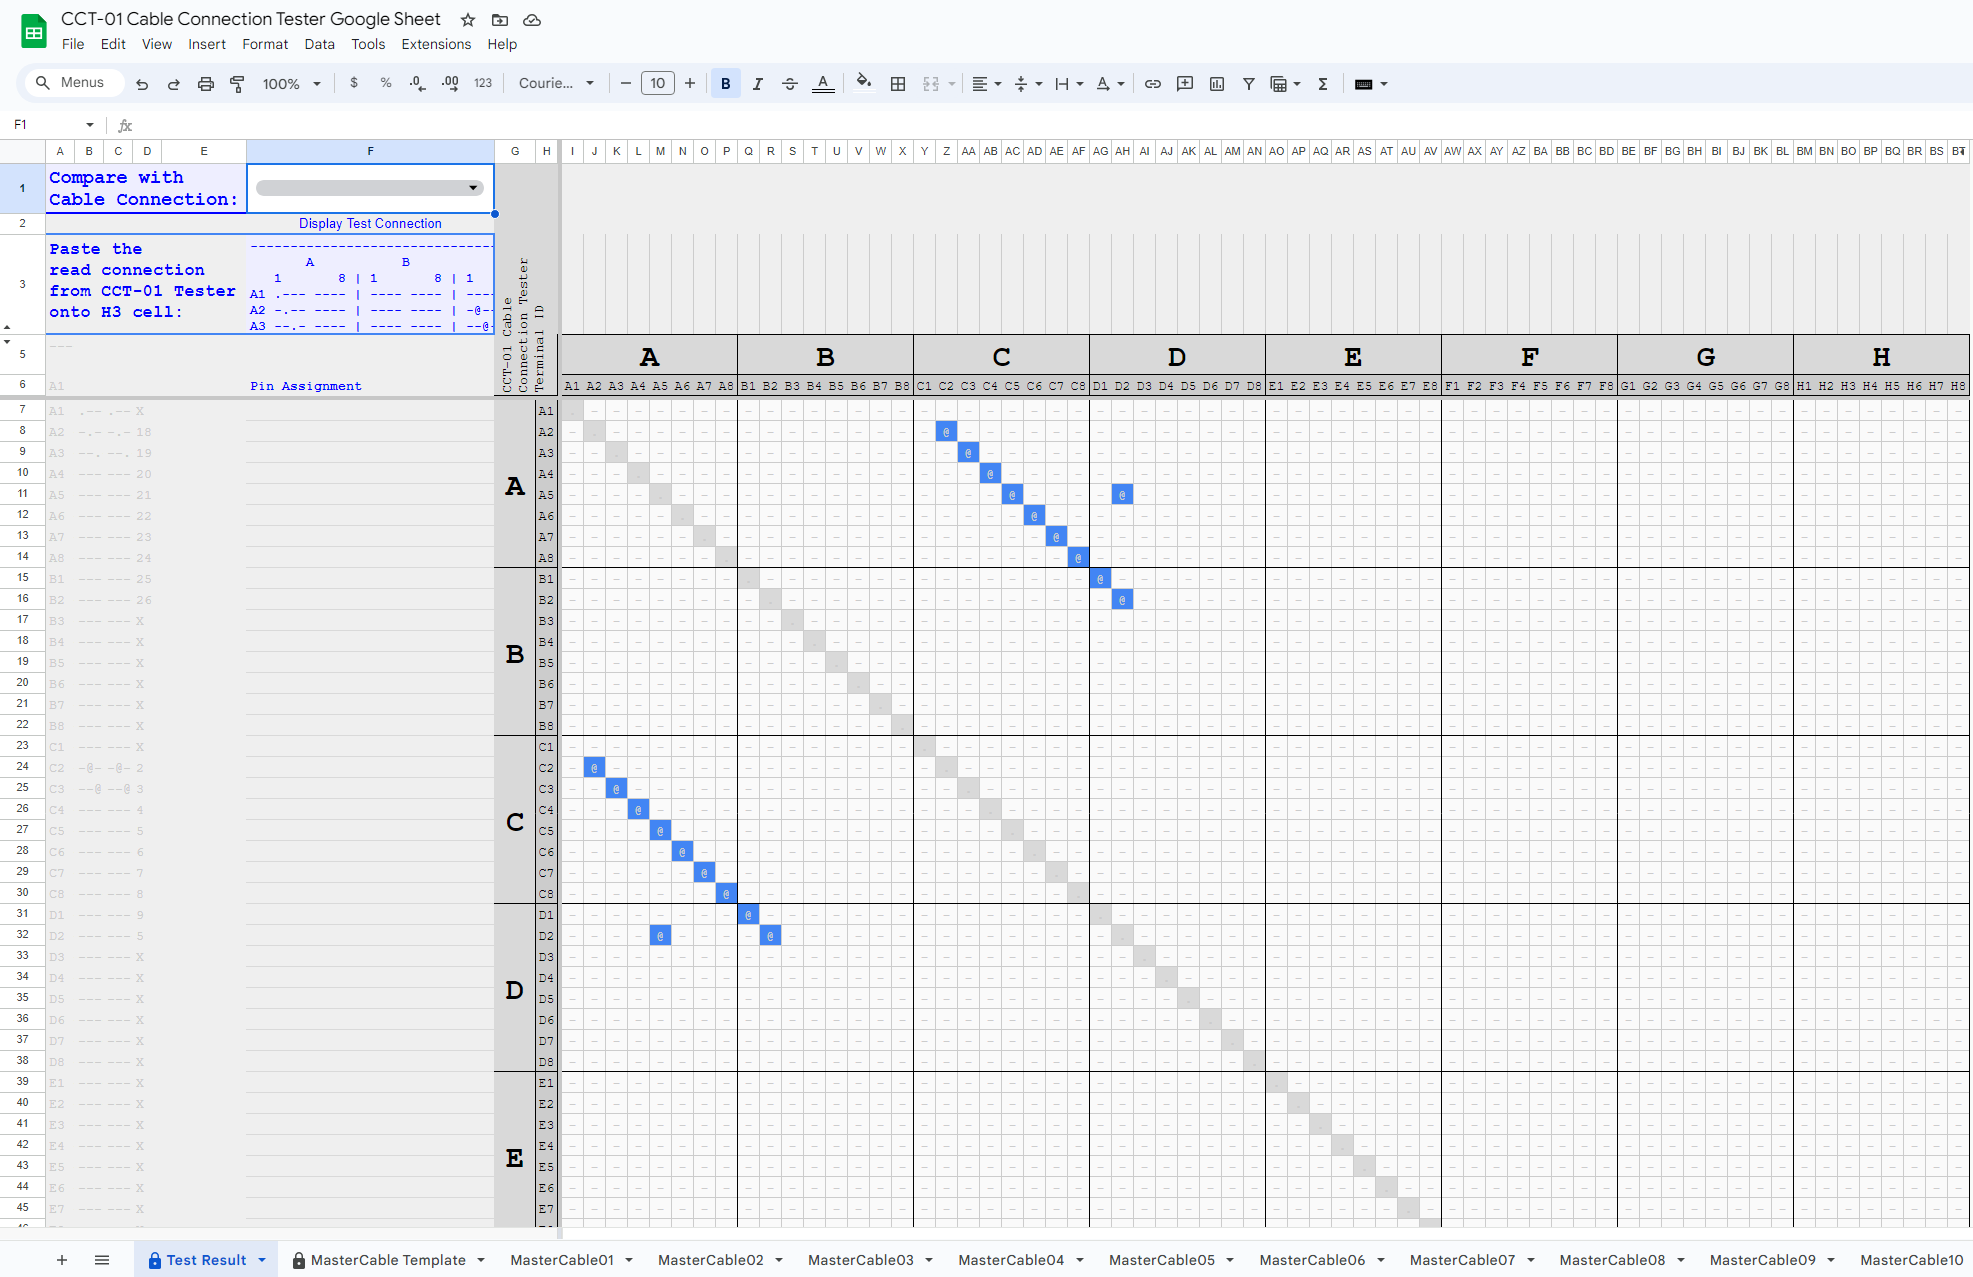
When both F1 and F3 are entered into this sheet, you will be able to see the generated result after comparing these two sets of connection. There will be an indicate display on cell F2 showing either “Same” or “Different”.
When the red “Different” indicator appeared, it means that the test cable is different from the master cable connection. This means a failed tested cable.
When the green “Same” indicator appeared, it means that the test cable is the same as the master cable connection. This test is a Pass.
On the connection matrix indicate symbol to represent the connection status between 2 terminal pins on the cable tester.
Symbol:
- @ (blue) – a connection.
- – (light gray) – no connection.
- . (gray) – indicates the same terminal pin (not tested).
- M (orange) – a missing connection.
- X (red) – unintended connection detected.