Serial USB Terminal app is a serial communication console tool on an Android mobile phone device. This tool is a handy tool which can be brought out along with you onsite for troubleshooting and diagnostic test.
Cable tester CCT-01 can also operates directly from your mobile device. No external power is required to the tester device.
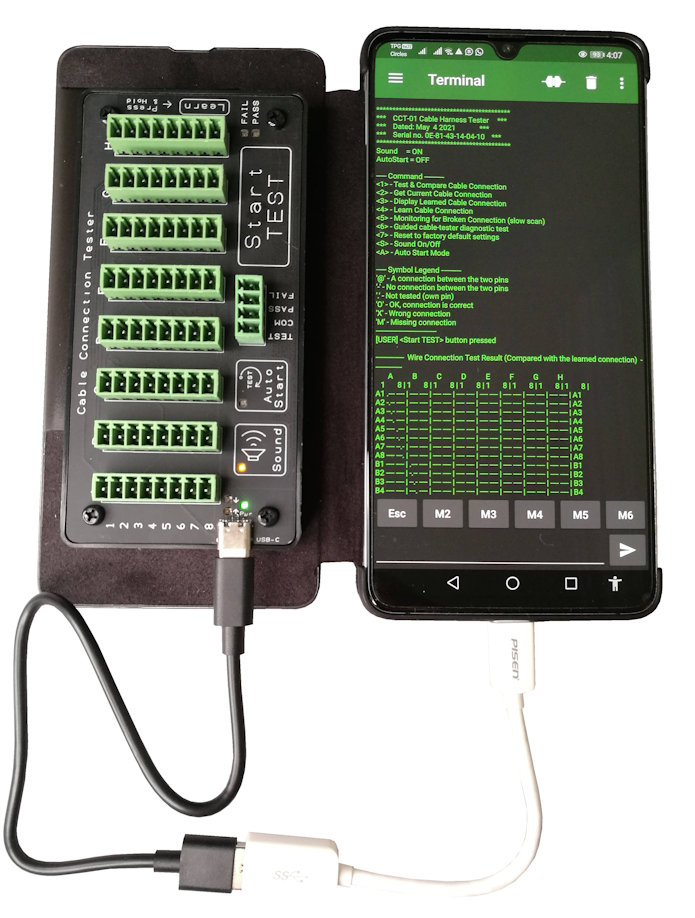
On this page, I am going to demonstrate to you how you can use this Serial USB Terminal app to connect it to your Cable Connection Tester CCT-01, to see the generated test report.
This setup guide assumes that you have an Android phone.
You only need to setup once. The settings will remains, and you simply only need to press the connect button each time you want to connect to the tester.
If you have further questions after going through this tutorial setup, feel free to email to us.
Download Serial USB Terminal app (for Android)
You can click here to download and install
your free Serial USB Terminal app onto your mobile device.
User Step-By-Step Guide
Step 1: Connect up the Cable Tester
Open the Serial USB Terminal app. You will come into this main screen.
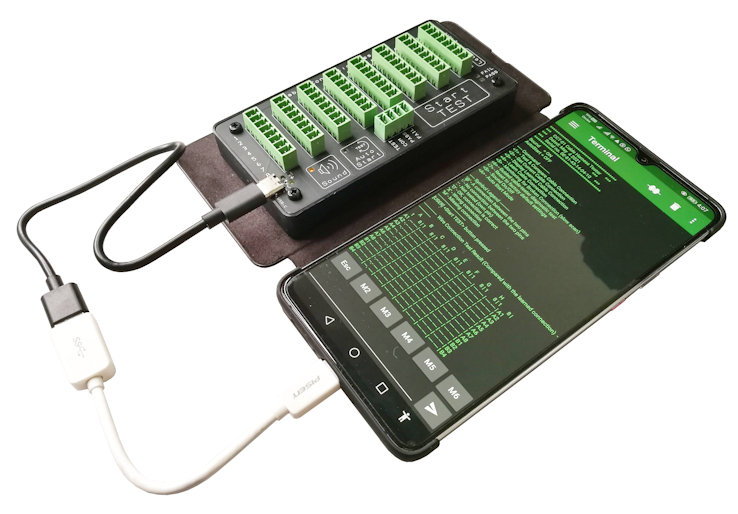
Connect up the cable tester to your mobile device. The cable tester will get its power directly from your mobile device. This essentially makes the setup portable and mobile.
You will need a USB-C cable (supplied together with your cable tester) and a OTG cable that plugs to your own mobile device.
The setup will be similar to what is shown in the picture on the right.
Note:
You will need a mobile device that can support OTG function (USB On-The-Go). Most mobile devices these days can support OTG.
If your phone doesn’t seems to work, there is a possibility that the phone do not support OTG.
When you first plug in and connect the Cable Tester to your mobile device, the following message may pops up.
Serial USB Terminal
Open Serial USB Terminal when this USB device is connected?
Just click “OK”
You should also notice the following orange color test on the Serial USB Terminal app.
USB device detected
Orange text are status message generated from this Serial USB Terminal app software.
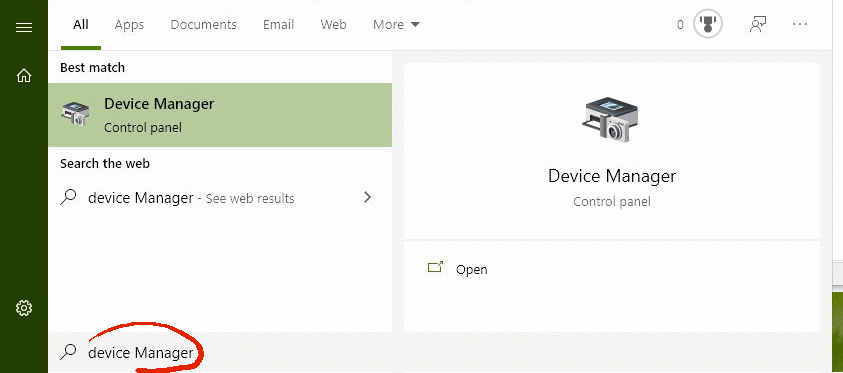
Step 2: Serial USB Terminal App Setup
Open the Serial USB Terminal app. You will come into this main screen.
On the top left side of the screen, click on the 3 horizontal line for the user menu.
This following menu will pop up.
Select the menu item “Settings”
Go to the menu’s tab “Serial”, and following the settings as follows.
Speed: 115200bps
Data: 8 bits
Stop: 1 bit
Parity: None
Flow control: None
Go to the menu’s tab “Terminal”, and following the settings as follows.
Font size: 10
Font style: Monospace
Charset: UTF-8
Display mode: Text
Auto scroll to end of buffer: On
Show connection messages: On
Show timestamps: Off
Choose for the smallest font size so that the complete report can be all displayed on the screen.
Choose “Monospace” font is the best. The display of the printed text showing the wire connection mapping will be aligned. I would recommend to set your screen to “landscape“. This will maximise the width of your display allowing you to see the connection mapping better. If the width of your screen is too small, you can simply choose “Normal” font.
Disable timestamps to make more room space for the display of the generated report.
Press the back arrow at the top left side of the app to return back to the main screen.
Step 3: Setup Button to send out command to the Cable Tester
When you return to the main screen, you will notice the default of 6 buttons at the bottom of the screen, namely M1 M2 M3 M4 M5 M6.
These are macro buttons which allows you to set the data which you want to send over to the cable tester when the macro button is pressed each time.
You can actually configure this app for more than 6 macro buttons.
For this user guide, we will only do it on 2 buttons M1 M2. You should get the idea how this app works and setup according to your preference.
Use your finger to press and hold on the button M1.
It will bring you to the following screen where you can edit this macro of this button.
For the name, instead of “M1”, we can change it to “Esc“. This macro that we are creating is to simulate the Esc key on a computer keyboard.
Name: Esc
Value: 1B
Edit mode: HEX
Action: Send
When this button is pressed, we will want to send a HEX data of 0x1B over to the Cable Tester device.
When the Cable Tester receive this command code, it will return a user menu on your screen.

You can do the same for the 2nd button M2.
This time round we are sending the keyboard key ‘1’ to the Cable Tester. This is essentially the same as pressing the “Start TEST” button on the Cable Tester itself.
For the name, we change it to “<1>“. This macro that we are creating is to simulate the ‘1’ key on a computer keyboard.
Name: <1>
Value: 31
Edit mode: HEX
Action: Send
When this button is pressed, we will send a HEX data of 0x31 over to the Cable Tester device.
When the Cable Tester receive this command code, it will test and compare the cable. After the test is done, it will generate a test report and present it on your display.
Step 4: Interacting with the Cable Tester
Once it is setup, the 6 buttons should now look like the following screenshot.
On the top right side, on the left side of the bin icon is a connection icon. They are in a disconnected state. Click on it so that the connection icon becomes connected as shown in the screenshot.
Connected to FTDI device
This indicate that the serial communication of your mobile device is now established with the Cable Tester. You can now start to send command to interact with the Cable Tester.
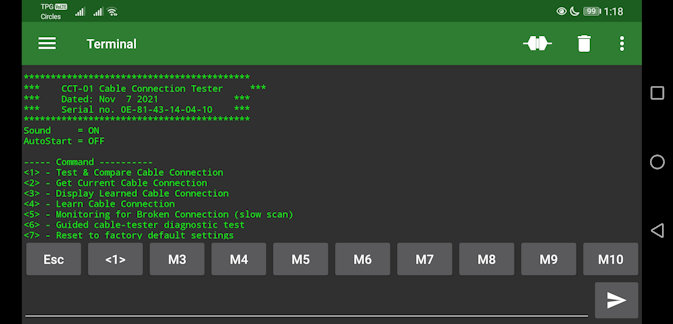
Now you can click on the macro button “Esc”. This send a command to the Cable Tester to print out a user menu.
A stream of green text will be displayed on your screen. The green text are information generated from the Cable Tester.
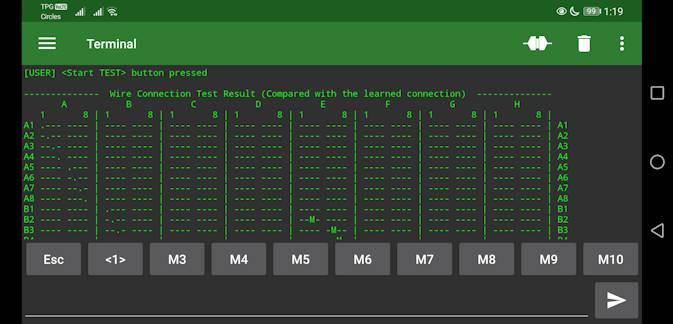
Now you can click on the macro button “<1>“. This will send a command to the Cable Tester to test the cable. This is essentially the same as pressing the “Start TEST” button on the CCT-01 Cable Tester.
A block of green text will be displayed on your screen. These are the connection matrix mapping report of the cable generated from the Cable Tester.
If you press the physical “Start TEST” button, you will also get to see the same response on your display.
There are many more commands which you can use. Check out the printed user menu on the screen for the other commands that you can use.
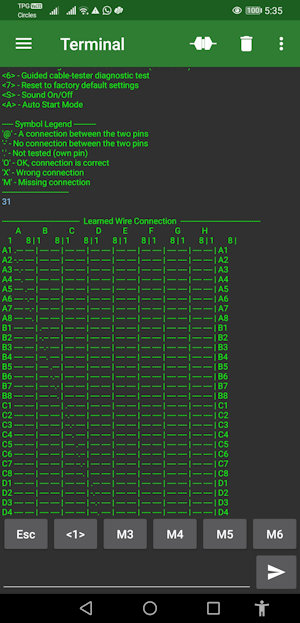
Landscape Display
Once again, my recommendation is to rotate your display to “landscape” orientation using the “monospace” font. This way, you will get the best visual display of the generated report on your screen.
Short video demonstration of the landscape view.
A short video demonstration of the landscape view on my mobile phone, with the cable test report generated by the cable tester.